I wanted a solution that fulfills the following criteria:
This setup reduces the amount of passwords and 2FA needed for different services. It also reduces the amount of logins, as you only need to login to one account.
I used the following software:
I assume you already have set up Nextcloud and an instance of Keycloak with a realm and users with the following URLs:
example.com
Configure
> Clients
> Create
Client ID
: nextcloud
Access Typ
: confidential
Valid Redirect URIs
: https://cloud.example.com/apps/oidc_login/oidc
or https://cloud.example.com/*
Credentials
Create groups as you like, eg. admin
, and add your users to them. The groups will be mapped 1:1 to those in Nextcloud.
Note that groups won't be created automatically in Nextcloud (Open PR).
Add a new attribute to the groups: Manage
> Groups
> GROUP_NAME
> Attributes
> Add
Key
: nextcloudquota
Value
: 549755813888
This is the size in bytes, here 512GiBCreate a new Mapper: Configure
> Clients
> nextcloud
> Mappers
> Create
Name
: Nextcloud Quota
Mapper Type
: User Attribute
User Attribute
: nextcloudquota
Token Claim Name
: nextcloudquota
Claim JSON Type
: String
Create another Mapper: Configure
> Clients
> nextcloud
> Mappers
> Create
Name
: Groups Mapper
Mapper Type
: Group Membership
Token Claim Name
: groups
Full group path
: OFF
Edit the config.php
file (there are no UI settings) with the according settings:
<?php
$CONFIG = array (
// STANDARD NEXTCLOUD CONFIG
// Some Nextcloud options that might make sense here
'allow_user_to_change_display_name' => false,
'lost_password_link' => 'disabled',
// OIDC SPECIFIC CONFIG
// URL of provider. All other URLs are auto-discovered from .well-known
'oidc_login_provider_url' => 'https://auth.example.com/auth/realms/example.com',
// Client ID and secret registered with the provider
'oidc_login_client_id' => 'nextcloud',
// the secret you copied from Keycloak
'oidc_login_client_secret' => '$SECRET',
// Automatically redirect the login page to the provider
'oidc_login_auto_redirect' => true,
// Redirect to this page after logging out the user
'oidc_login_logout_url' => 'https://auth.example.com/auth/realms/example.com/protocol/openid-connect/logout?redirect_uri=https%3A%2F%2Fcloud.example.com%2F',
// Quota to assign if no quota is specified in the OIDC response (bytes)
// 15GB
'oidc_login_default_quota' => '549755813888',
// Hide the NextCloud password change form.
'oidc_login_hide_password_form' => true,
// Attribute map for OIDC response
'oidc_login_attributes' => array (
'id' => 'preferred_username',
'name' => 'name',
'mail' => 'email',
'quota' => 'nextcloudquota',
'groups' => 'groups',
),
// Set OpenID Connect scope
'oidc_login_scope' => 'openid profile',
// Disable creation of new...
The following is my config and should explain what most things do and why.
nginx.conf
This limits the maximal connections per IP
worker_processes auto;
pid /nginx/run/nginx.pid;
daemon off;
pcre_jit on;
events {
worker_connections 2048;
use epoll;
}
http {
limit_conn_zone $binary_remote_addr zone=limit_per_ip:10m;
limit_conn limit_per_ip 128;
limit_req_zone $binary_remote_addr zone=allips:10m rate=150r/s;
limit_req zone=allips burst=150 nodelay;
The custom log format is needed for nginx amplify (statistics and more)
include /nginx/conf/mime.types;
default_type application/octet-stream;
log_format main_ext '$remote_addr - $remote_user [$time_local] "$request" '
'$status $body_bytes_sent "$http_referer" '
'"$http_user_agent" "$http_x_forwarded_for" '
'"$host" sn="$server_name" '
'rt=$request_time '
'ua="$upstream_addr" us="$upstream_status" '
'ut="$upstream_response_time" ul="$upstream_response_length" '
'cs=$upstream_cache_status' ;
access_log /nginx/logs/nginx_access.log main_ext;
error_log /nginx/logs/nginx_error.log warn;
The maximum upload size is 25GB
nginx doesn't send that the webserver is nginx
but server
client_max_body_size 25G;
aio threads;
aio_write on;
sendfile on;
keepalive_timeout 15;
keepalive_disable msie6;
keepalive_requests 100;
tcp_nopush on;
tcp_nodelay on;
server_tokens off;
more_set_headers 'Server: secret';
Content will be encoded in brötli (which Safari now supports)
gzip off;
brotli on;
brotli_static on;
brotli_buffers 16 8k;
brotli_comp_level 6;
brotli_types
text/css
text/javascript
text/xml
text/plain
text/x-component
application/javascript
application/x-javascript
application/json
application/xml
application/rss+xml
application/vnd.ms-fontobject
font/truetype
font/opentype
image/svg+xml;
This will include all config files from /sites-enabled. The following configuration is the part you'll configure yourself.
include /sites-enabled/*.conf;
include /nginx/custom_sites/*.conf;
include /nginx/conf.d/stub_status.conf;
}
The preceding configuration is part of the included nginx.conf of my Dockerimage.
/sites-enabled/default.conf
These TLS parameters currently result in a 100% score in all categories on https://www.ssllabs.com/ssltest
upstream php-handler {
server unix:/php/run/php-fpm.sock;
}
ssl_protocols TLSv1.2 TLSv1.3;
ssl_ciphers [TLS13+AESGCM+AES256|TLS13+CHACHA20]:ECDHE-ECDSA-AES256-GCM-SHA384:ECDHE-RSA-AES256-GCM-SHA384:ECDHE-ECDSA-CHACHA20-POLY1305:ECDHE-RSA-CHACHA20-POLY1305;
ssl_ecdh_curve secp521r1:secp384r1;
ssl_prefer_server_ciphers on;
ssl_session_cache shared:SSL:20m;
ssl_session_timeout 15m;
ssl_session_tickets off;
ssl_stapling on;
ssl_dyn_rec_enable on;
resolver 1.1.1.1 1.0.0.1 ipv6=off;
ssl_stapling_verify on;
#RSA certificates
ssl_certificate /certs/example.com/fullchain.pem;
ssl_certificate_key /certs/example.com/key.pem;
#ECDSA certificates
ssl_certificate /certs/example.com_ecc/fullchain.pem;
ssl_certificate_key /certs/example.com_ecc/key.pem;
ssl_trusted_certificate /certs/example.com/fullchain.pem;
I use custom HTTP error pages and I used this for creating them: https://github.com/AndiDittrich/HttpErrorPages
error_page 400 401 402 403 404 500 501 502 503 520 521 533 /error/HTTP$status.html;
This server redirects all of the unencrypted connections to https. It uses the same url, except when it's accessed over the IP address, then it redirects to the root of the domain.
server {
listen 8000 default_server;
server_name _;
include /sites-enabled/headers.conf;
if ($host ~ "\b\d{1,3}\.\d{1,3}\.\d{1,3}\.\d{1,3}\b" ) {
return 301 https://example.com$request_uri;
}
return 301 https://$host$request_uri;
}
This server redirects unused subdomains.
server {
listen 4430 ssl http2;
server_name www.example.com;
return 301 https://example.com$request_uri;
include /nginx/conf.d/hsts.conf;
include /sites-enabled/headers.conf;
}
This is the server that listens on the root of the domain, in my case it redirects to the media
subdomain.
server {
listen 4430 ssl http2 default_server;
#listen [::]:4430 ssl http2;
server_name example.com;
include /nginx/conf.d/hsts.conf;
include /sites-enabled/headers.conf;
return 301 https://media.example.com$request_uri;
location /error/ {
alias /www/errorpages/;
internal;
}
}
I use Organizr to organize (duh) all of my apps I regularly use. Definitely check it out if...
This tutorial will show you how you can use your and your friend's Plex login to login to Nextcloud.
First you need to setup this piece of software, you can install it natively or use my docker for which you can find the tutorial here.
If you use unRAID you can add https://github.com/Starbix/docker-templates to your template repositories if you want to use the docker template.
You need to enable LDAP user and group backend
in Nextcloud which is an official app.
Then go into the LDAP user and group backend
settings and set like the following pictures:
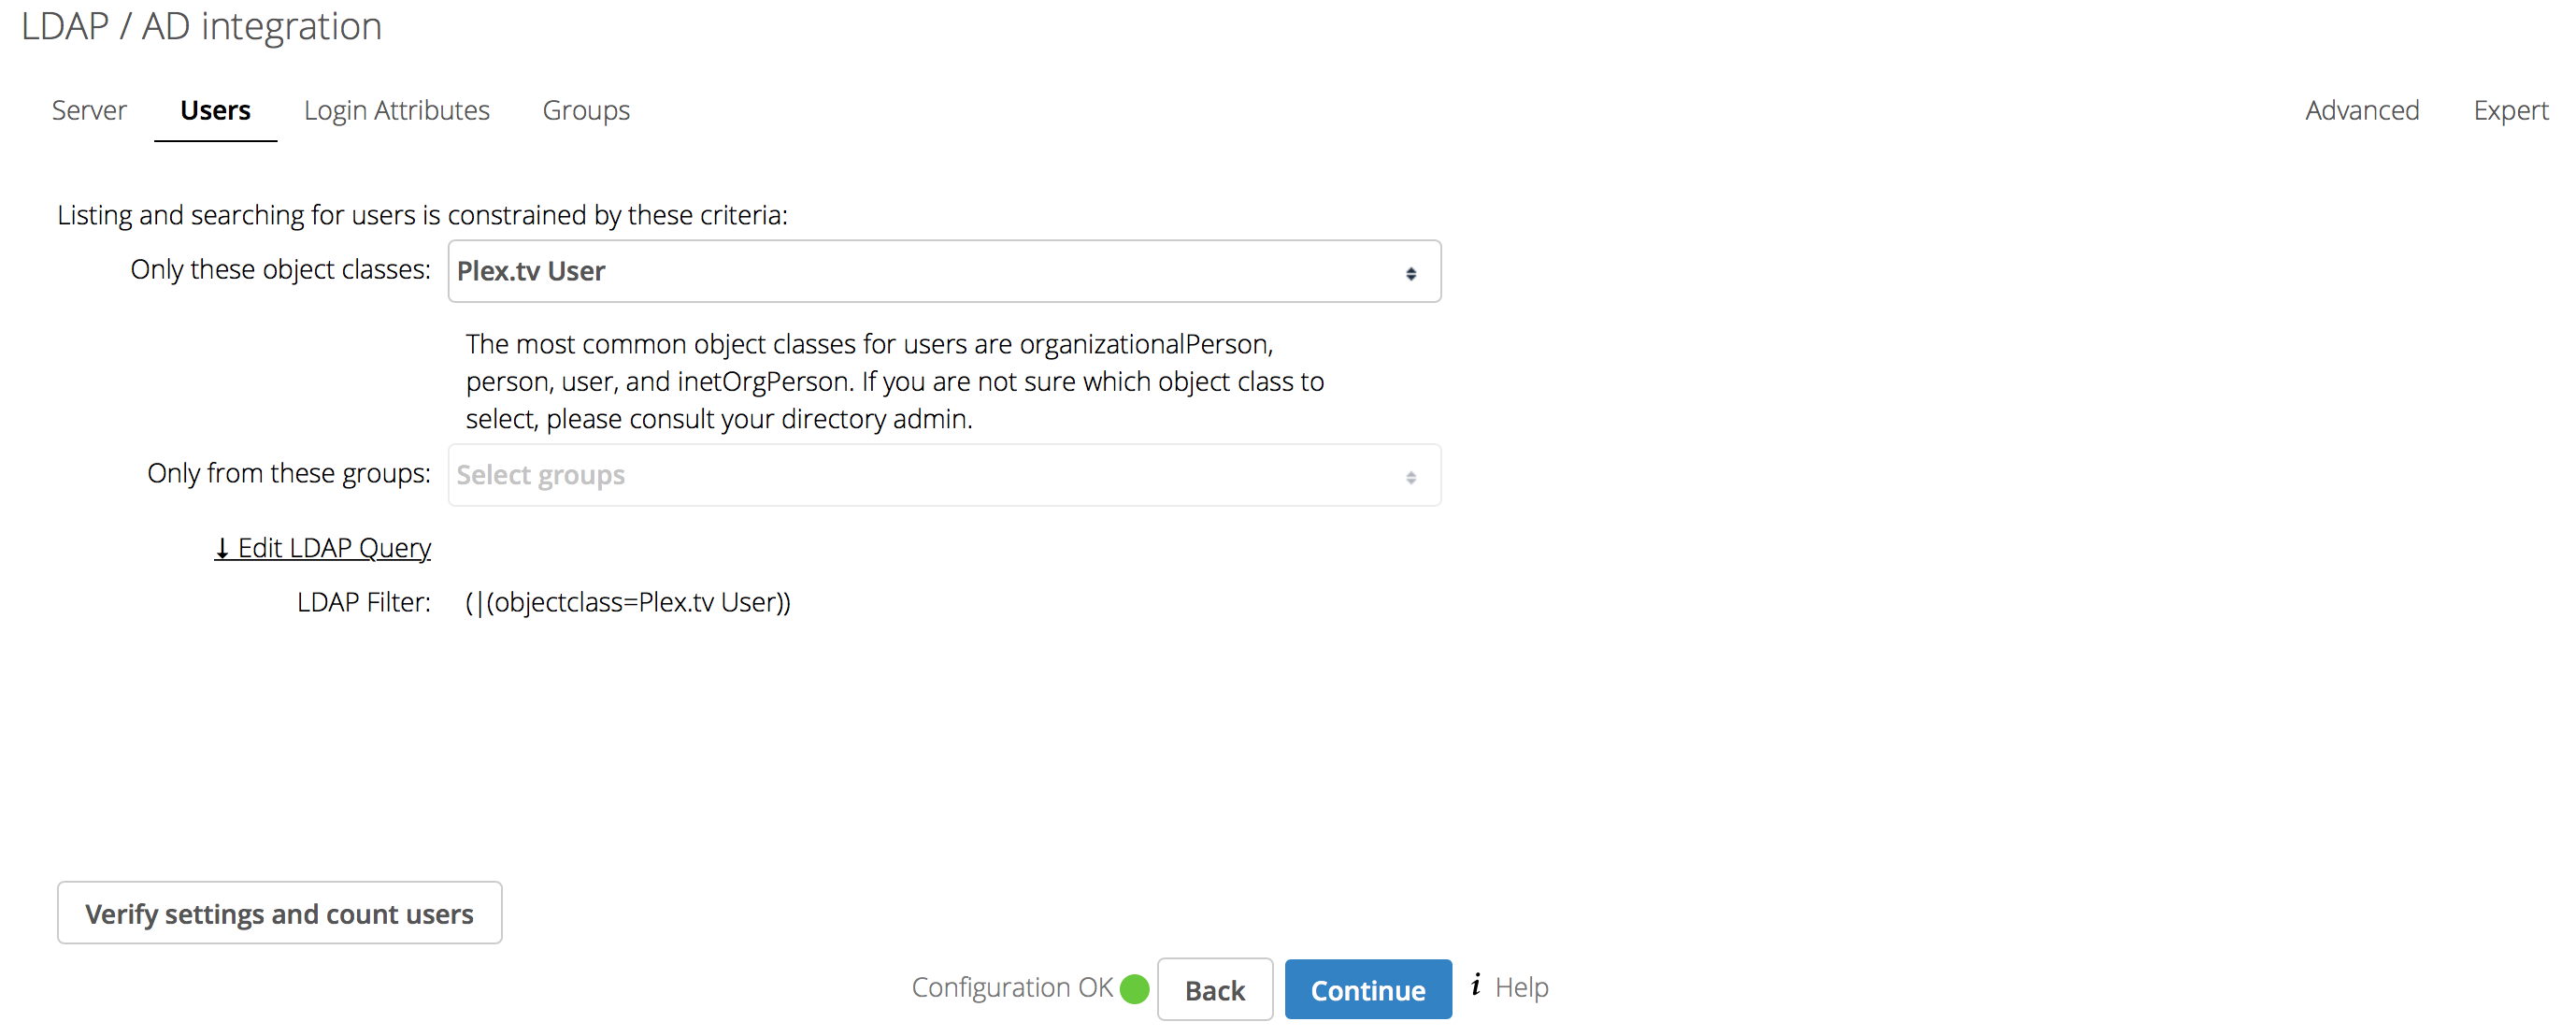
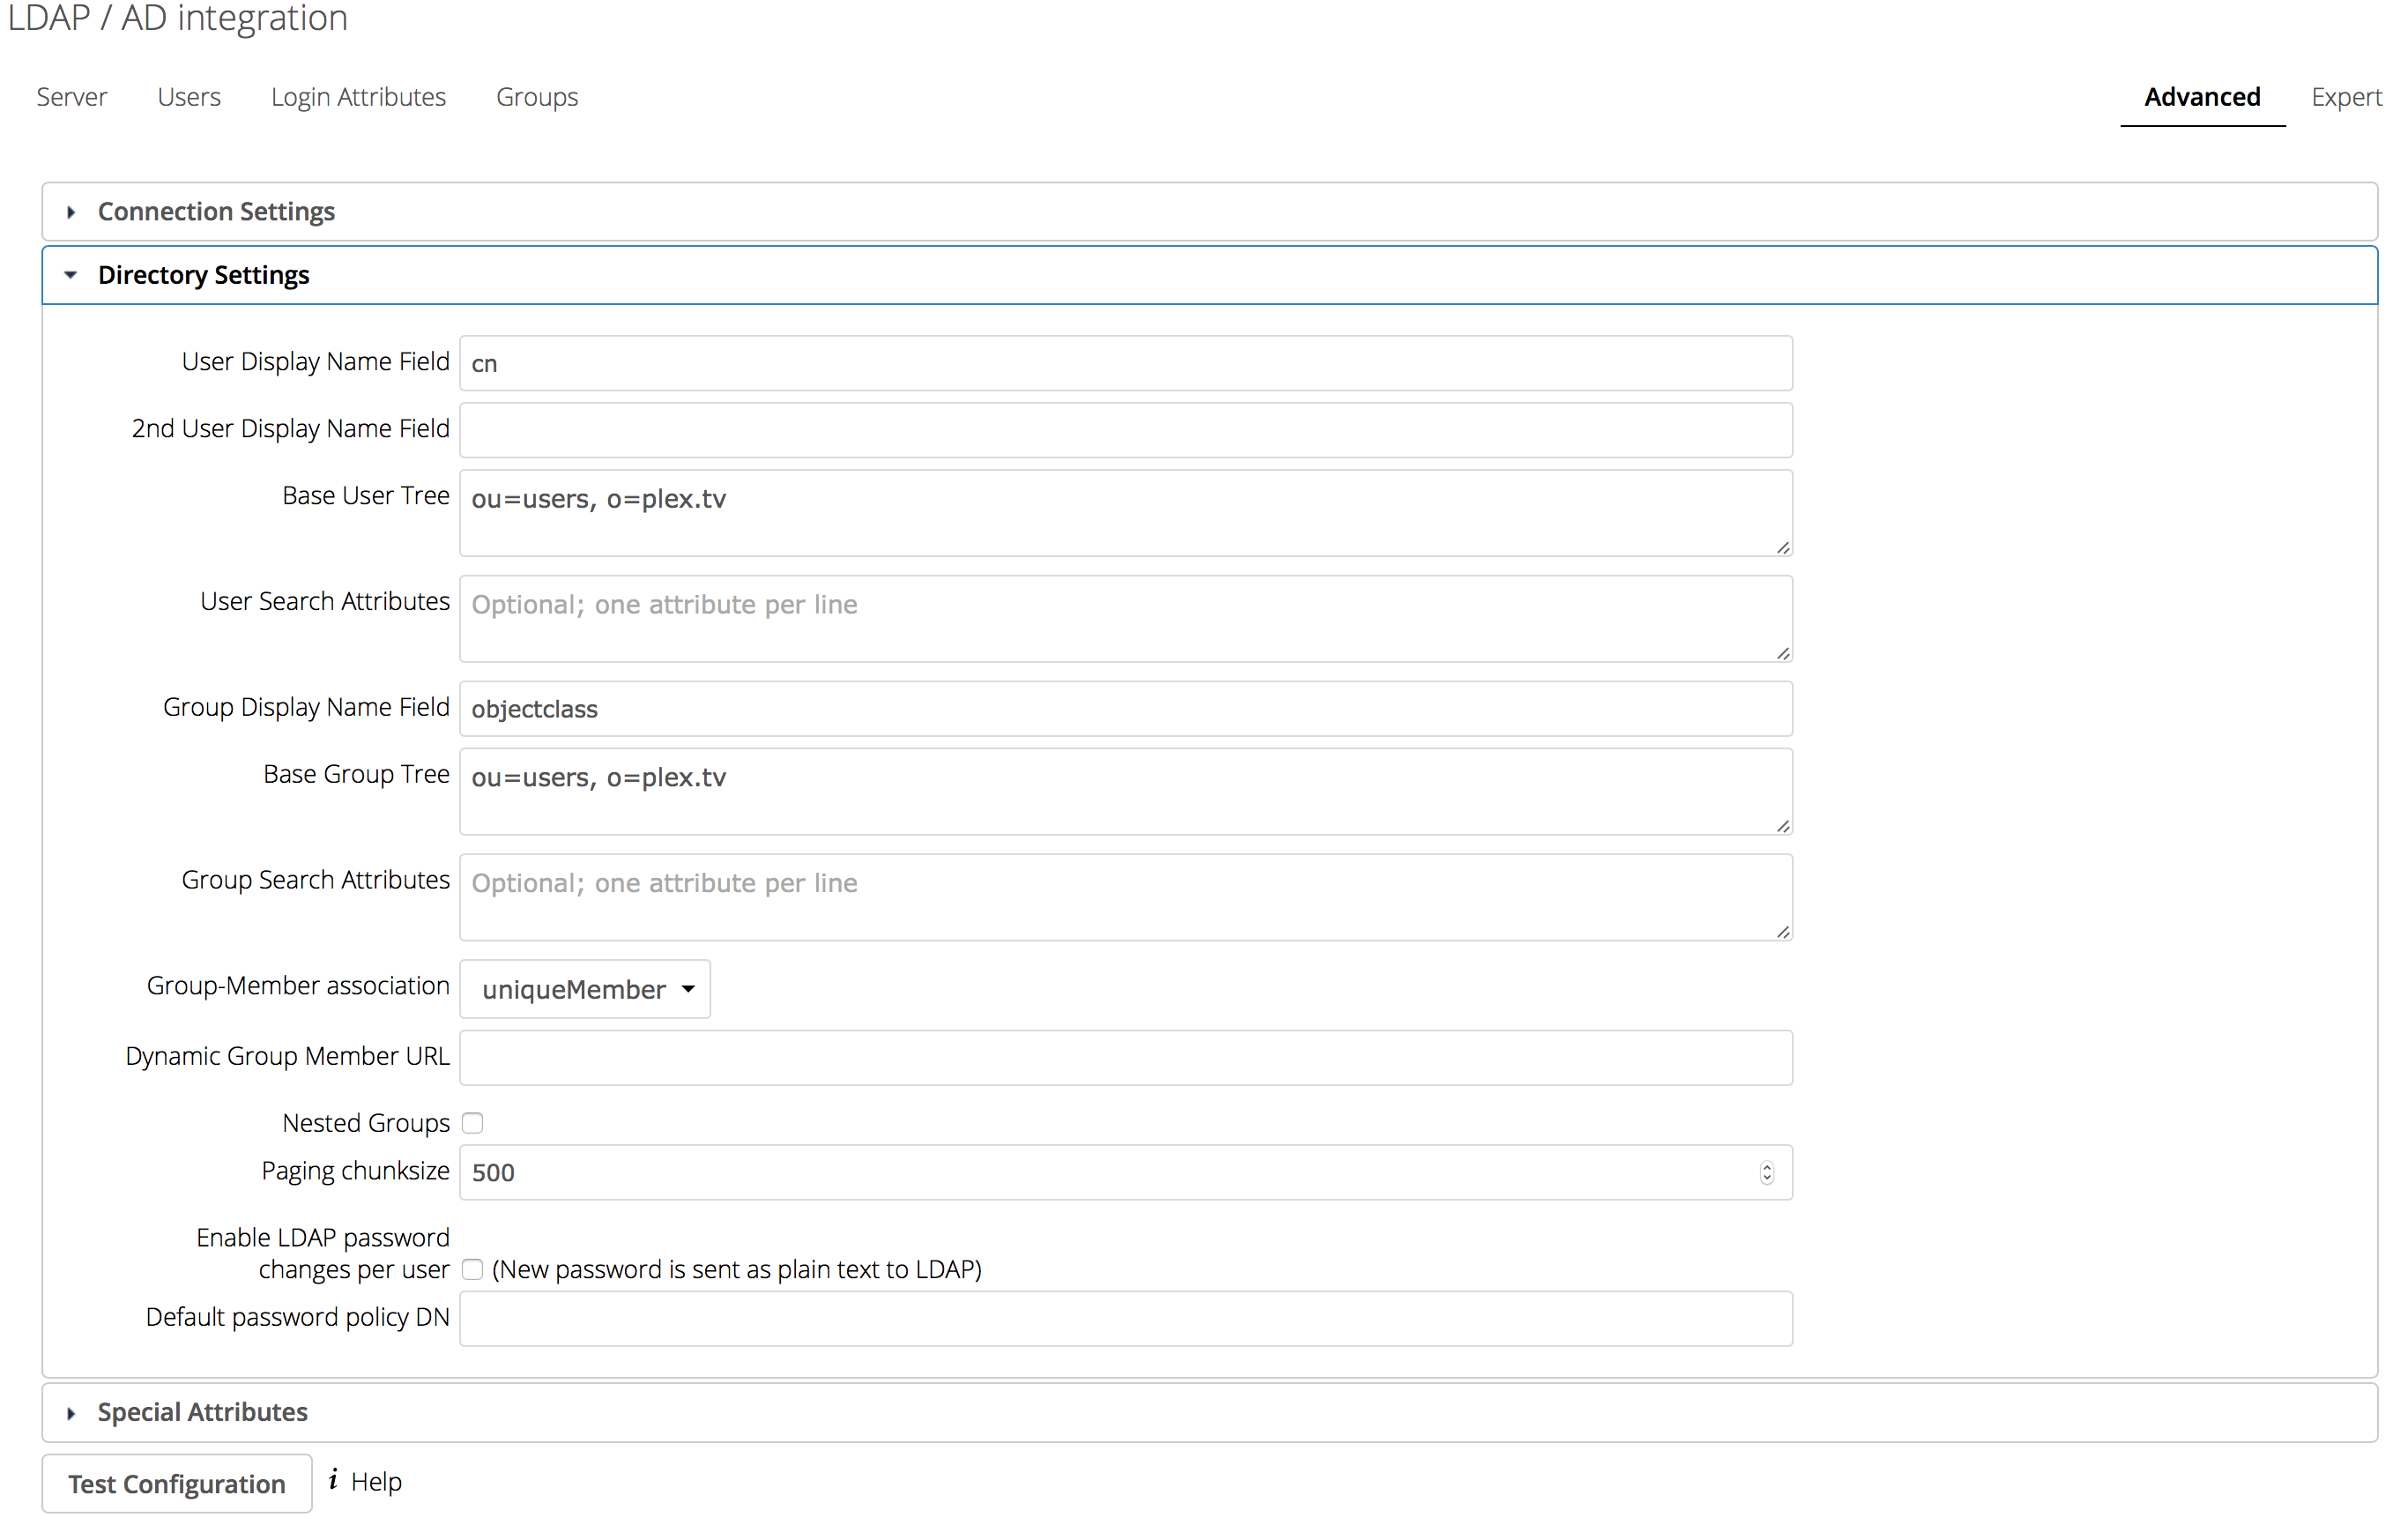
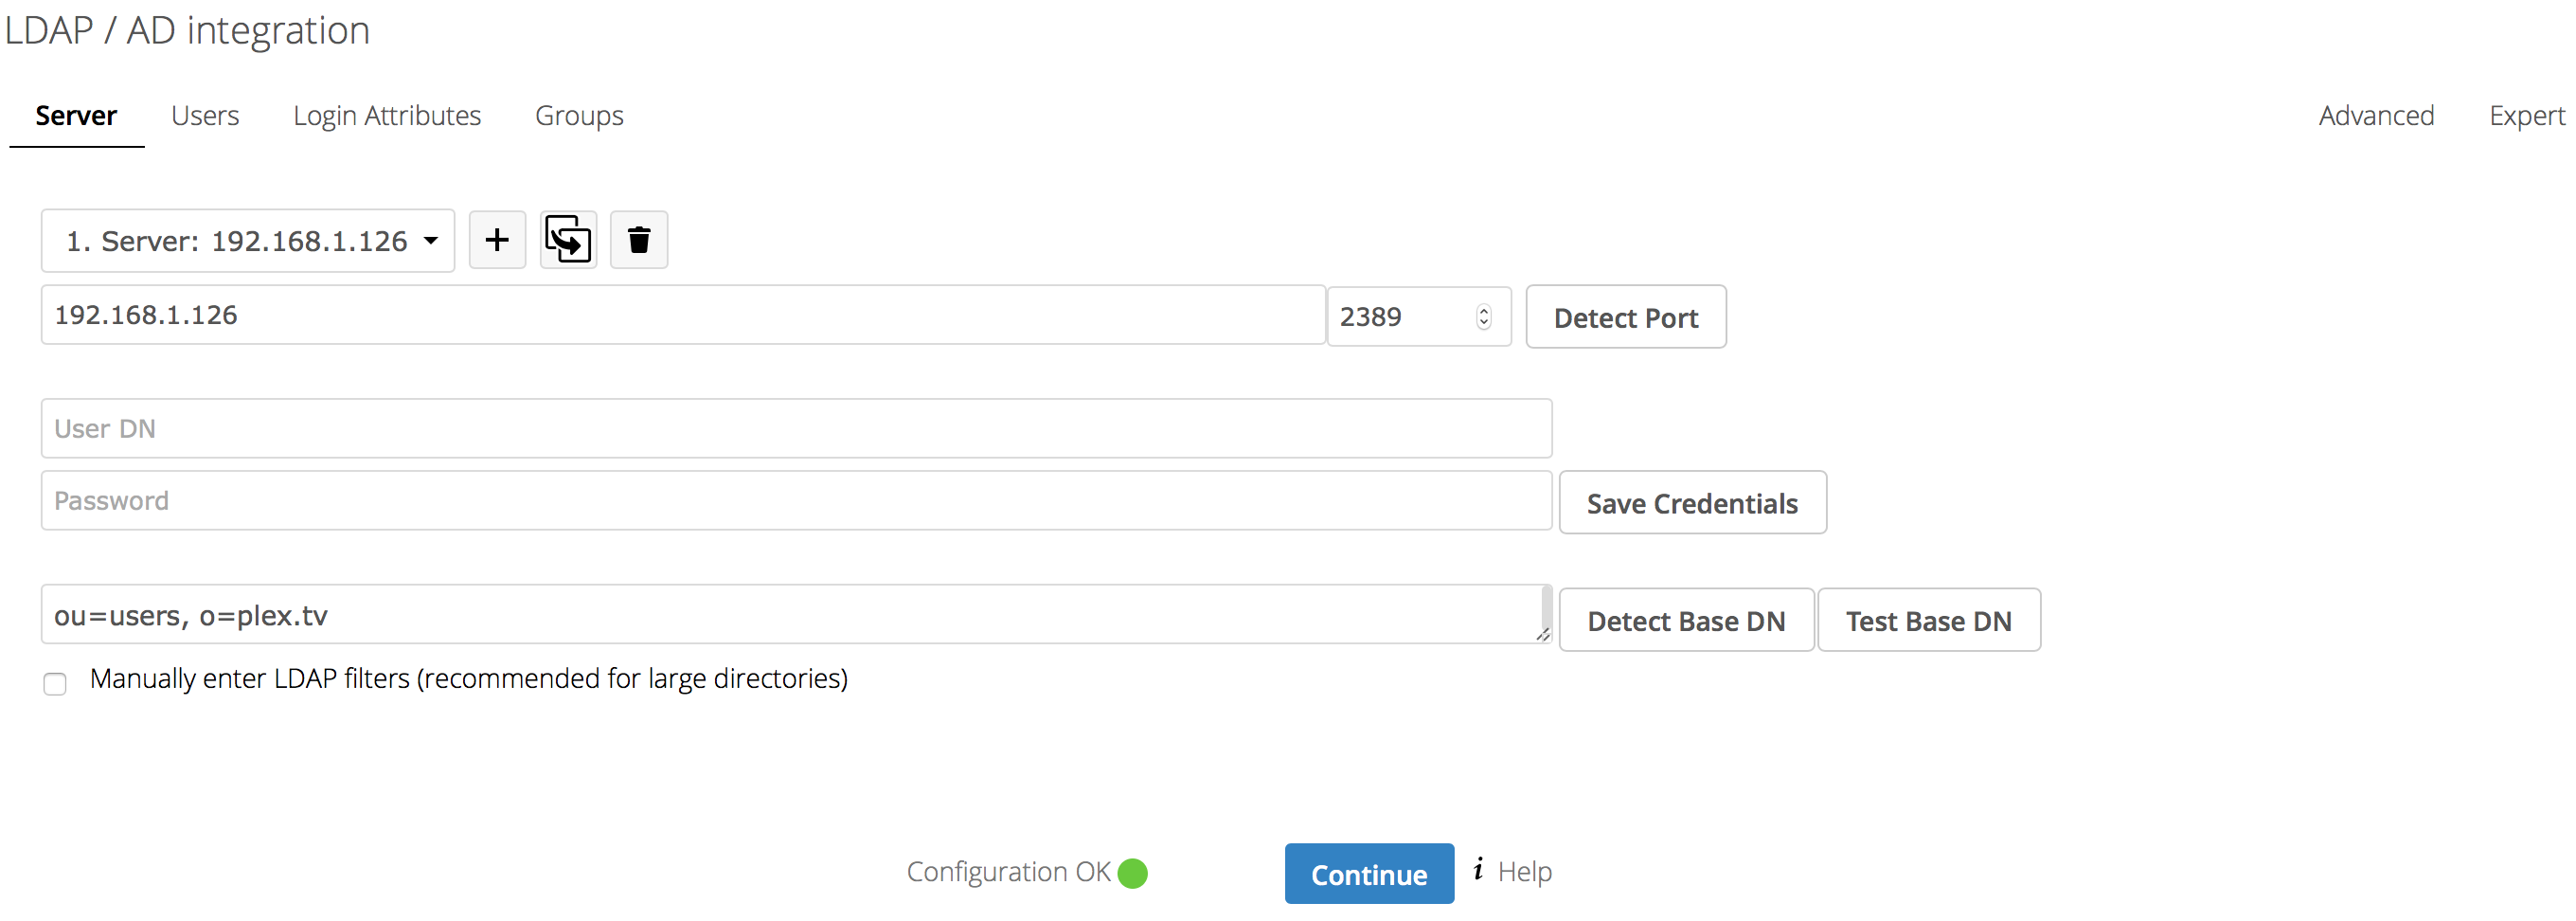
Use the IP your LDAP for Plex instance runs on
Note: It doesn't add the Plex users to the Plex.tv group automagically, you need to do that manually.
]]>I'm not going into how to create the Hyperion config and how to install the LEDs on your TV. There are already a lot tutorials for that, like Awesome Pi. Instead of the WS2801 LEDs I recommend the APA102 LEDs which have better colors and the cabling needs to be different as we're going to use an Arduino between the LEDs and Odroid.
Now, there are two problems with the Odroid C2. The first one is, that it doesn't support SPI, a serial communication interface used to communicate with the APA102. This can be solved by using an Arduino between the Odroid and the LEDs. The second problem is, that there's no official hyperion binary for the Odroid C2. Which meant that I had to compile it on my own, but more on that later.
First you need to prepare your Arduino. For that you need to download the Arduino IDE from here. After you've installed the Arduino IDE, you need to select your Board Type under Tools>Board where you select Arduino/Genuino Uno and just below you also need to select the serial port for the Arduino, this can change from computer to computer. You then need to paste the code from here into the IDE and then upload it to the Arduino. You can then plug the LED pins into the Arduino with jumper cables. SPI data out is digital pin 11 and clock is digital pin 13. If you want to test if you've connected it correctly you can also uncomment the test pattern part. You should then see a red, green and blue flash.
Now comes the interesting part.
So you don't have to compile Hyperion for yourself, I have a Github Repository with precompiled binaries. If you don't trust me, you can also compile them yourself. I also have a slightly modified Gtihub Repo for that, as it won't compile otherwise. You need to use this command: cmake -DENABLE_DISPMANX=OFF -DENABLE_SPIDEV=OFF -DENABLE_AMLOGIC=ON -DCMAKE_BUILD_TYPE=Release -Wno-dev ..
Install LibreELEC on your Odroid.
In order to install Hyperion on your Odroid you need to make sure to enable SSH, you might need to restart after that. Then you need to connect to it over SFTP. For that I use Cyberduck, but any other SFTP client should work. Navigate to /storage
and create a hyperion
directory.
To get the files you need to put into the hyperion
folder, navigate to my precompiled binaries. There are different folders for different binaries. You need to use the hyperion (v1) odroid-aml patched. Upload its content to the previously created hyperion
directory. Make sure you delete my config and replace...
unRAID makes running a cloud based unlimited Plex server not as easy as it's on Ubuntu. So here's a tutorial for unRAID.
To install the needed plugins, just enter
https://raw.githubusercontent.com/Squidly271/community.applications/master/plugins/community.applications.plg
to Plugins > Install Plugin. After refreshing the site you should see a new Tab called Apps, under that Tab you just search for User Scripts and rclone and install both of those plugins.
For our setup we also need unionfs and plexdrive for which I didn't find any plugin, so I wrote my own. Install it like Community Applications with https://raw.githubusercontent.com/Starbix/unRAID-plugins/master/plugins/unionfs.plg and https://raw.githubusercontent.com/Starbix/unRAID-plugins/master/plugins/plexdrive.plg.
To edit your rclone config, SSH into your server and execute rclone config
.
Add the following remotes:
Name Type
==== ====
gdrive drive
gdrivecrypt crypt ("remote" = "/mnt/disks/pd/crypt")
uploadcrypt crypt ("remote" = "gdrive:crypt")
Note: Use the same password for the crypt remotes.
Then create the config file of plexdrive using
plexdrive mount /mnt/disks/pd -c "/mnt/user/appdata/plexdrive" -o allow_other -v 2
then upload mountcheck files used for checking whether everything is mounted properly or not
touch mountcheck
rclone copy mountcheck uploadcrypt:Series -vv --no-traverse
rclone copy mountcheck uploadcrypt:Movies -vv --no-traverse
rclone copy mountcheck uploadcrypt: -vv --no-traverse
Then go to
After setting up your rclone shares, go into Settings > User Scripts.
Here we'll need to add several scripts. (These scripts are mostly stolen from hoarding.me)
fuse_mount - at Startup of the Array
#!/bin/bash
if [[ -f "/mnt/user/media/cloud/Series/mountcheck" ]] && [[ -f "/mnt/user/media/cloud/Movies/mountcheck" ]]; then
echo "$(date "+%d.%m.%Y %T") INFO: Check successful, Series and Movies fuse mounted."
exit
else
echo "$(date "+%d.%m.%Y %T") ERROR: Series and Movies not mounted, remount in progress."
# Unmount before remounting
fusermount -uz /mnt/user/media/cloud/Series
fusermount -uz /mnt/user/media/cloud/Filme
unionfs -o cow,allow_other,direct_io,auto_cache,sync_read /mnt/user/media/cloud/Seriestmp=RW:/mnt/disks/crypt/Series=RO /mnt/user/media/cloud/Series
unionfs -o cow,allow_other,direct_io,auto_cache,sync_read /mnt/user/media/cloud/Moviestmp=RW:/mnt/disks/crypt/Movies=RO /mnt/user/media/cloud/Movies
if [[ -f "/mnt/user/media/cloud/Series/mountcheck" ]] && [[ -f "/mnt/user/media/cloud/Movies/mountcheck" ]]; then
echo "$(date "+%d.%m.%Y %T") INFO: Remount of Series and Movies successful."
else
echo "$(date "+%d.%m.%Y %T") CRITICAL: Remount failed."
fi
fi
exit
rclone_mount - at Startup of the Array
#!/bin/bash
mkdir -p /mnt/disks/pd
mkdir -p /mnt/disks/crypt
#This section mounts the various cloud storage into the folders that were created above.
if [[ -f "/mnt/disks/crypt/mountcheck" ]]; then
echo "$(date "+%d.%m.%Y %T") INFO: Check successful, crypt mounted."
exit
else
echo "$(date "+%d.%m.%Y %T") ERROR: Drive not mounted, remount in progress."
# Unmount before remounting
fusermount -uz /mnt/disks/crypt
fusermount -uz /mnt/disks/pd
plexdrive mount /mnt/disks/pd -c "/mnt/user/appdata/plexdrive" -o allow_other -v 2 &
rclone mount --max-read-ahead 512M --allow-other --allow-non-empty -v --buffer-size 1G gdrivecrypt: /mnt/disks/crypt &
if [[ -f "/mnt/disks/crypt/mountcheck" ]]; then
echo "$(date "+%d.%m.%Y %T") INFO: Remount successful."
else
echo "$(date "+%d.%m.%Y %T") CRITICAL: Remount failed."
fi
fi
exit
rclone_unmount - at Stopping of the Array
#!/bin/bash
fusermount -uz /mnt/user/media/cloud/Movies
fusermount -uz...
]]>